2026-09-30
Chair squats: leaning forward isn’t always bad form
Your torso can tilt without slumping. See why a forward lean belongs in a chair squat, then try a simple three-rep comparison with illustrated form cues.
Tip Top Fitness · Exercise form · Guide 1
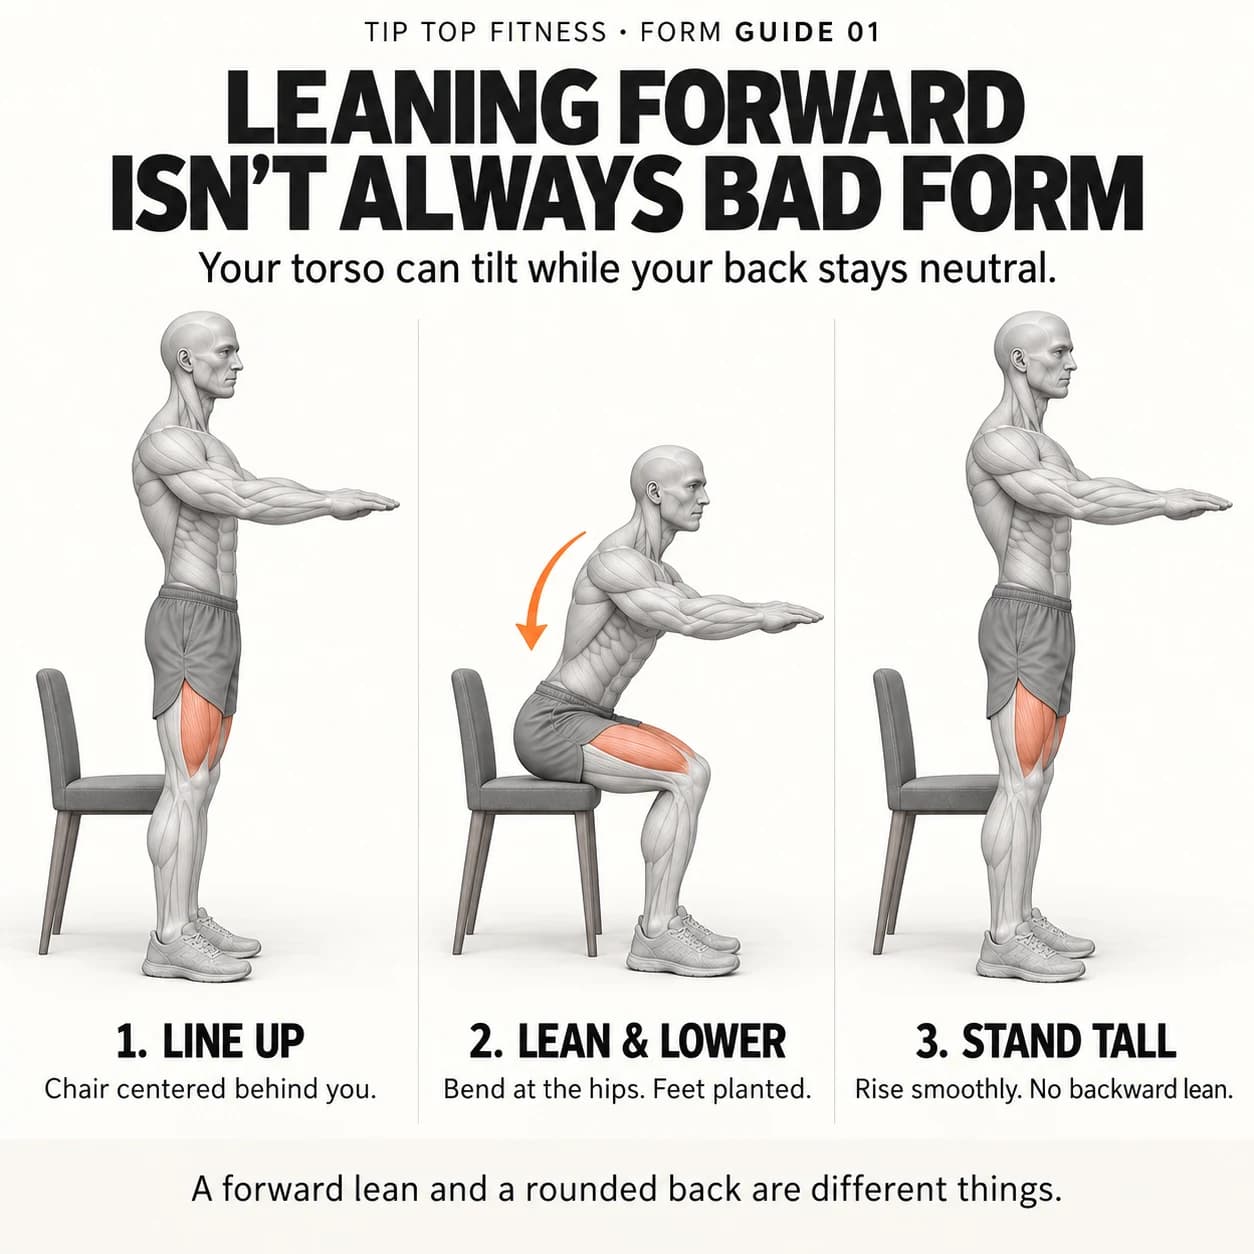
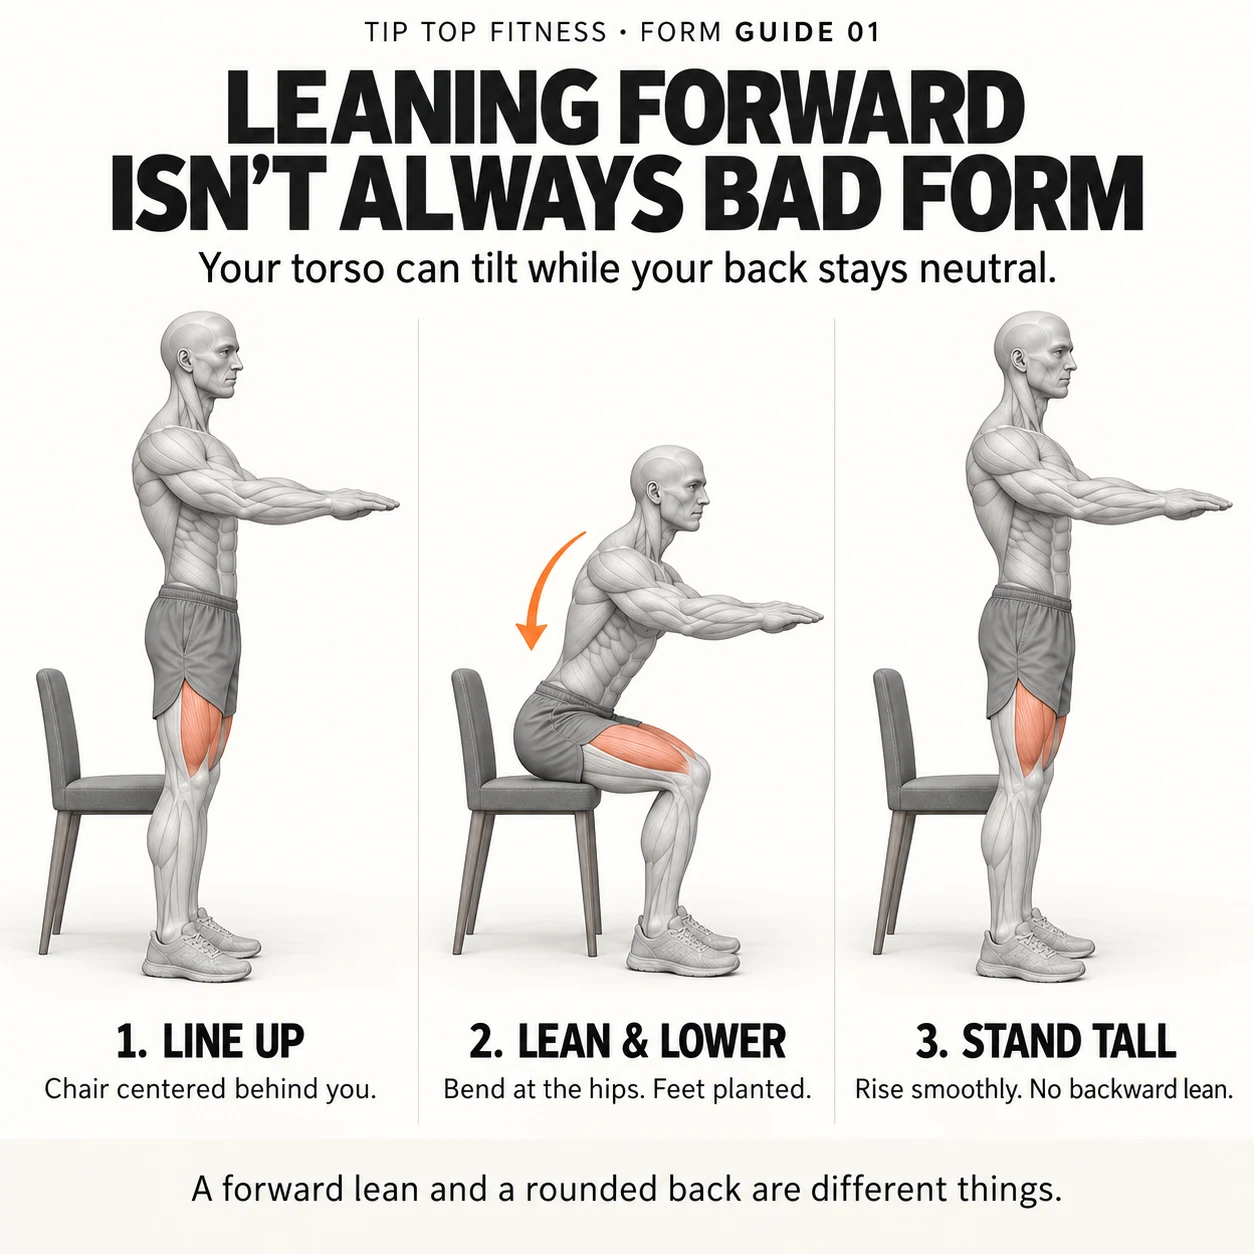
“Keep your chest up” can be a useful cue. But taking it to mean “keep your torso vertical the whole time” misses something important: when you rise from a chair, moving forward can be part of moving up. A forward lean is not automatically a form mistake.
The detail to watch: tilt is not the same as slump
Your torso angle and your spine’s shape are two different things. You can tip forward at the hips while keeping a comfortable, naturally curved back. In the illustration, the middle position shows that distinction. It does not mean you should freeze your spine, exaggerate an arch, or chase an exact angle.
A forward weight shift helps bring your body toward the feet that will support you as you leave the seat. That is why South Tees NHS sit-to-stand guidance includes bringing the shoulders forward before rising. This is a movement explanation, not a promise that one cue fixes every difficult chair rise.
Try a three-rep comparison, not a strength test
Only try this if standing from a chair is already comfortable and safe for you. Use the stable setup below, and keep any support you normally need. Start seated with both feet flat. Keep the same chair, foot placement and hand support for all three repetitions so you are comparing the cue, not three different exercises.
Rep 1: stand as you normally would, then sit back down with control. Rep 2: allow a comfortable forward tilt from your hips before pressing through your feet to rise. Rep 3: repeat that cue only if it felt comfortable. Notice whether the rise felt smoother or unchanged. Do not deliberately struggle through a bolt-upright version, add a big rocking motion, or remove needed support to make the comparison dramatic.
If nothing changes, that is useful information too. A cue is not a diagnosis, and this comparison does not tell you whether your legs are “weak.” Chair setup, assistance and individual movement differences still matter. Stop rather than force a result.
Set up the chair before you start
Choose a firm, stable chair without wheels, on a floor where it cannot slide. Put its back against a wall. Avoid a soft sofa or a low seat that makes standing difficult. Clear the space around your feet. If balance is uncertain, have appropriate support or a person beside you rather than trying an unsupported version.
1. Find your starting position
Stand just in front of the seat, facing away from it, with the chair centered behind your pelvis rather than off to one side. Start with feet around hip-to-shoulder width and a comfortable slight toe turn-out. Keep your heels and the front of both feet in contact with the floor. Reach your arms forward if that helps balance. Gently tighten your abdomen while continuing to breathe.
2. Lower with control
Bend at your hips and knees, sending your hips back toward the seat. Let your torso lean forward naturally while keeping your back comfortably neutral. Keep your knees moving in the same direction as your toes. Lower only as far as you can control, then touch the seat gently. Think “quiet landing.”
3. Stand up smoothly
Press your feet into the floor and straighten your hips and knees together. Breathe out as you rise. Finish upright without leaning backward. Reset before the next repetition. Stop the set when you can no longer repeat the movement with the same control.
Watch the landing, not just the angle
A more useful question than “Does my squat look perfectly upright?” is “Can I repeat it with steady feet and a quiet landing?” If you drop onto the seat, make the lowering part slower or use a higher, stable seat. You can sit fully and reset between repetitions instead of bouncing off the chair.
Heels lifting or feet rolling: shorten the movement and re-establish contact across each foot. Knees collapsing inward: watch whether they follow your toes and choose a stance you can control. Forcing more depth when your position is changing is a reason to adjust the exercise, not to push harder.
Holding your breath or arching at the top: keep breathing and finish in a comfortable standing position. You do not need a dramatic chest lift or a backward lean to complete the repetition.
The takeaway worth sharing
A forward lean and a rounded back are different things. Save the illustration as a reminder to look at the whole movement, not just one frozen angle. If you record a side view, put the phone down before starting rather than turning your head during the repetition. Share this with a training partner who has been trying to stay completely upright during every chair squat.
When to get individual guidance
Stop if the movement causes pain, dizziness, or loss of balance. Recent surgery, a current injury, or medical exercise restrictions call for guidance from your treating clinician. A general form guide cannot assess those circumstances.
For help choosing a version that fits your experience, explore beginner personal training or one-on-one strength training in Santa Barbara. Training at home is also an option in Montecito and the surrounding service area. Text Laurence about a $60 first full-hour session using the button below.
Further reading and demonstrations
The movement guidance was checked against the American Council on Exercise bodyweight squat guide, Mayo Clinic’s squat demonstration, and Mayo Clinic’s chair-standing guidance. The original illustration was created for this guide in the same visual style as the Tip Top Fitness app’s stretch and foam-roll demonstrations.
For more on the forward weight shift, see University Hospitals Plymouth’s standing guidance. A biomechanics study of 47 healthy young adults observed coordinated hip and spinal movement during chair rises. That supports avoiding the idea of a completely rigid spine; it does not prescribe one ideal angle for everyone. The three-rep comparison here is an educational practice suggestion, not a validated assessment.